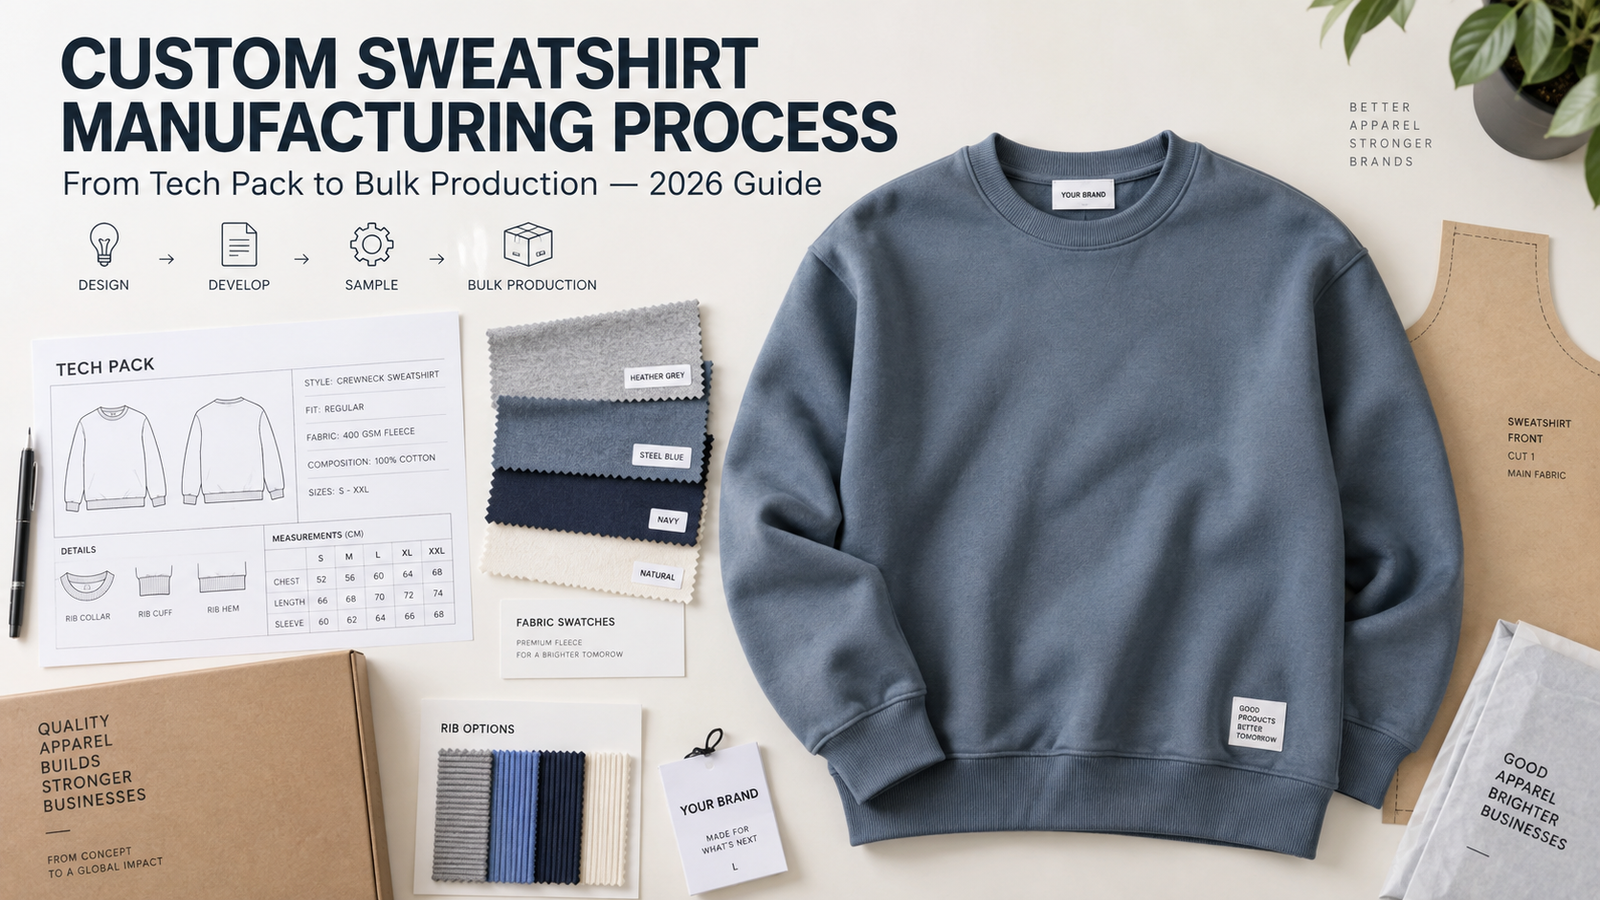
Designing a sweatshirt and manufacturing one consistently at scale are two very different tasks.
A reference image may show the silhouette you want, but a factory still needs to convert that visual idea into measurable production instructions.
Before bulk production can begin, several decisions have to be locked:
- Fabric specification
- Pattern measurements
- Shoulder construction
- Collar and rib dimensions
- Sewing method
- Artwork placement
- Labels and packaging
- Wash performance
- Measurement tolerances
This guide focuses specifically on how a custom sweatshirt moves through an apparel factory, from the first tech pack to the final packed production order.
For a broader introduction to sweatshirt fabrics, GSM, fits and decoration methods, see our general sweatshirt guide.
The Custom Sweatshirt Manufacturing Process
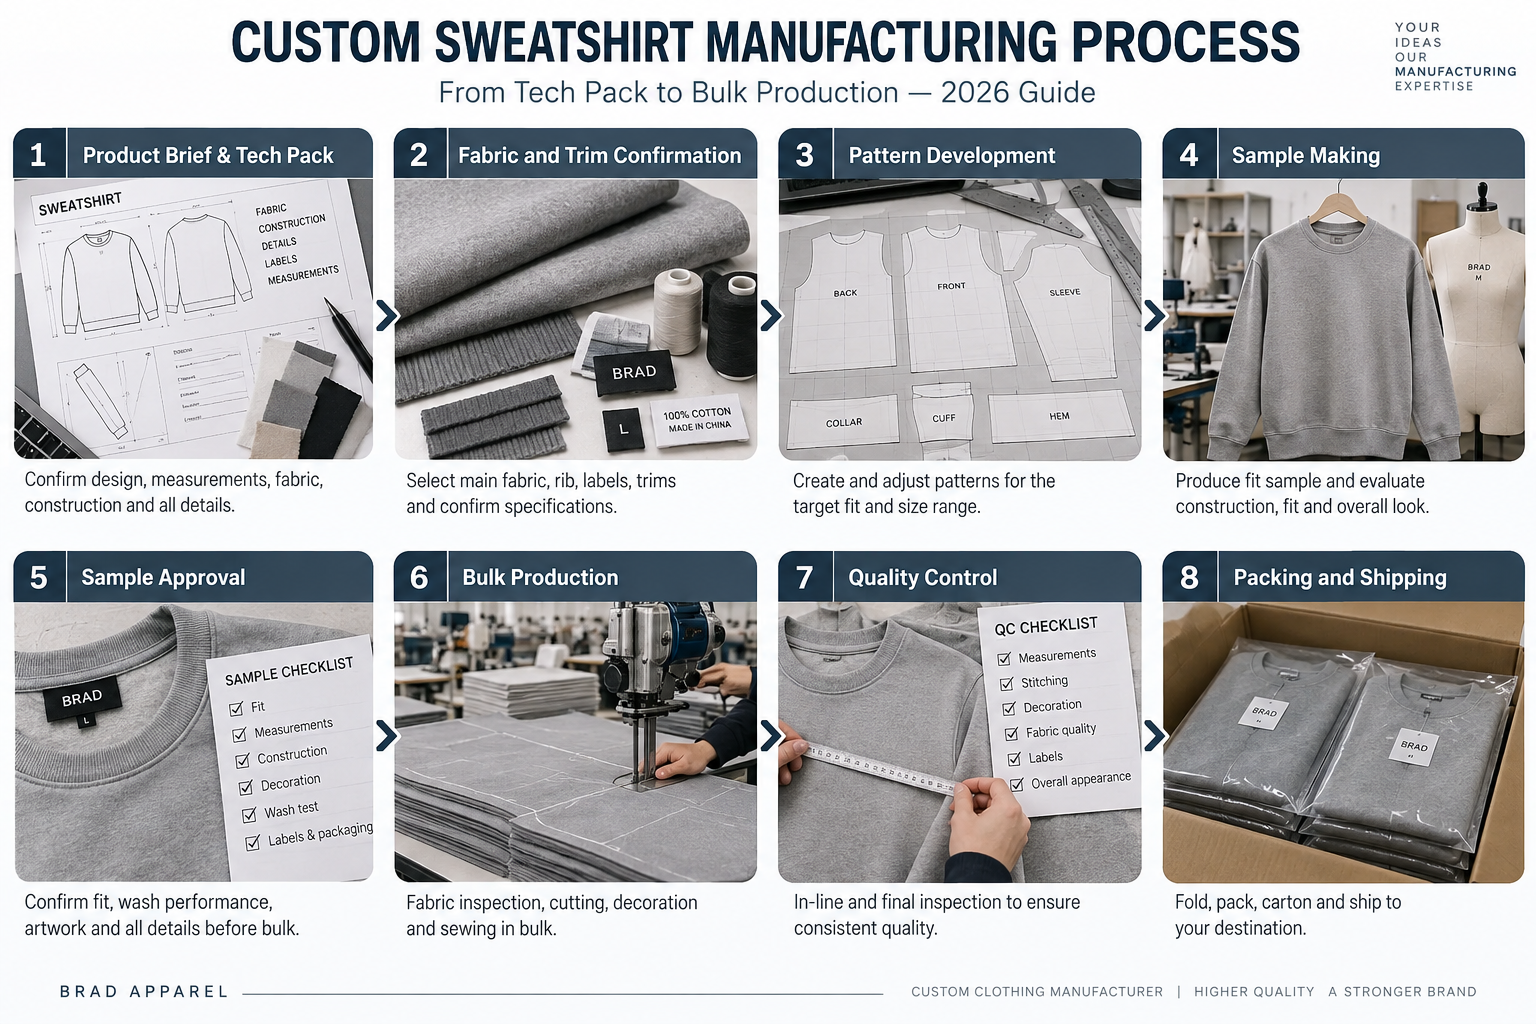
A typical custom sweatshirt project can be divided into eight stages:
1. Product Brief & Tech Pack Review
↓
2. Fabric and Trim Confirmation
↓
3. Pattern Development
↓
4. Sample Making
↓
5. Fit, Wash & Construction Approval
↓
6. Bulk Cutting and Decoration
↓
7. Sewing and Quality Control
↓
8. Packing and Shipping
Each stage affects the next.
Changing the fabric can change the pattern.
Changing the pattern can change fabric consumption.
Changing the decoration can change the production sequence.
That is why a sweatshirt should be developed as one complete manufacturing system.
1. Start With a Production Brief
The first factory question should not be:
“Can you make this sweatshirt?”
It should be:
“What exact sweatshirt are we making?”
A useful production brief turns a visual design into measurable specifications.
Example Sweatshirt Production Brief
| Specification | Example |
|---|---|
| Product | Crewneck sweatshirt |
| Fit | Oversized / boxy |
| Main Fabric | 100% combed cotton French terry |
| Fabric Weight | 420 GSM |
| Shoulder | Drop shoulder |
| Sleeve | Set-in sleeve |
| Collar | Heavy 2×2 cotton/spandex rib |
| Decoration | Front puff print |
| Main Label | Custom woven label |
| Care Label | Custom printed care label |
| Packaging | Frosted individual polybag |
| Target Quantity | 500 pcs |
A clear brief allows the factory to estimate:
- Fabric consumption
- Pattern complexity
- Sewing operations
- Decoration cost
- Sampling requirements
- Production time
- FOB price
A reference photo alone normally cannot provide all of this information.
2. Confirm the Fabric Before Finalizing the Pattern
Fabric and pattern should not be developed independently.
A sweatshirt pattern made for a soft, lighter knit may behave very differently when produced in dense 420 GSM cotton French terry.
Before pattern approval, the factory should confirm:
- Fiber composition
- GSM
- Fabric width
- Stretch
- Recovery
- Shrinkage
- Surface finish
- Colour
Physical fabric swatches are especially useful because two fabrics with similar written specifications can still have noticeably different:
- Hand feel
- Density
- Drape
- Surface texture
The pattern should be tested using fabric that is as close as possible to the intended bulk material.
3. Pattern Development Defines the Silhouette
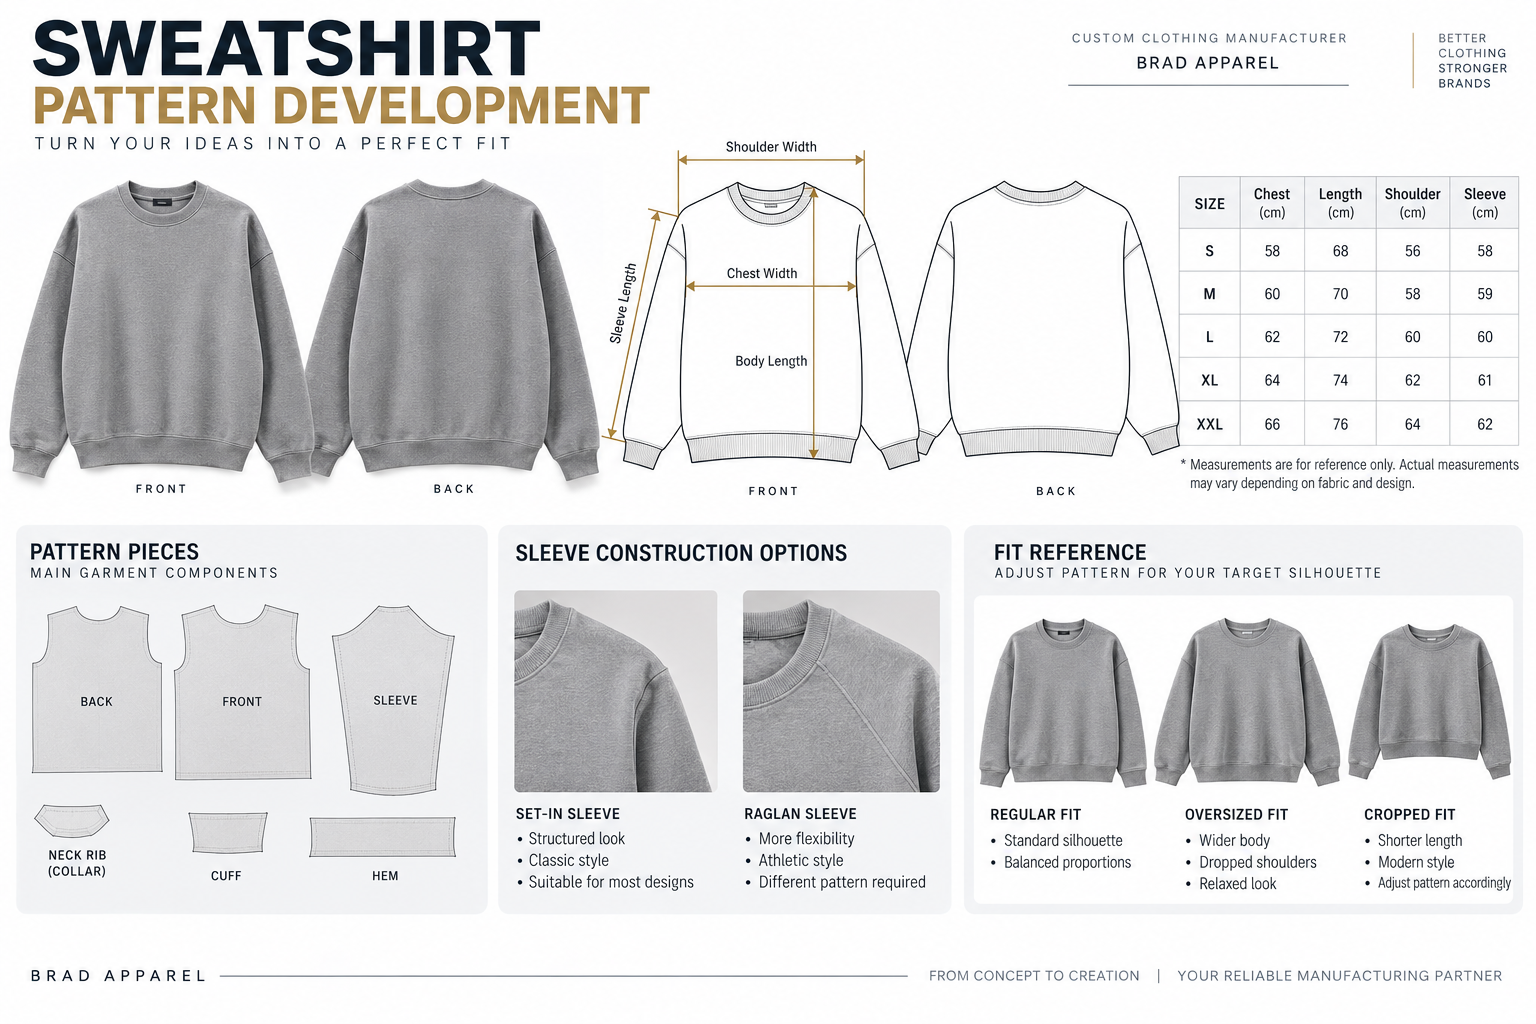
An oversized sweatshirt is not created by simply making a regular sweatshirt one or two sizes larger.
Pattern balance matters.
Important measurement points include:
- Chest width
- Body length
- Shoulder width
- Armhole depth
- Sleeve width
- Sleeve length
- Cuff opening
- Neck opening
- Bottom opening
For a boxy streetwear silhouette, the factory may increase width without increasing length proportionally.
For a dropped-shoulder silhouette, the shoulder point moves outward and the sleeve pattern must be adjusted accordingly.
Set-In Sleeve
A set-in sleeve uses a defined armhole seam.
This construction works well for:
- Structured crewnecks
- Boxy silhouettes
- Drop-shoulder streetwear
- More defined garment geometry
Raglan Sleeve
A raglan sleeve extends toward the neckline rather than using a conventional shoulder seam.
It can provide:
- More shoulder mobility
- Softer shoulder definition
- Athletic styling
The sleeve type should be decided before the pattern is finalized because the two constructions require different pattern pieces.
4. Collar Construction Has to Be Engineered
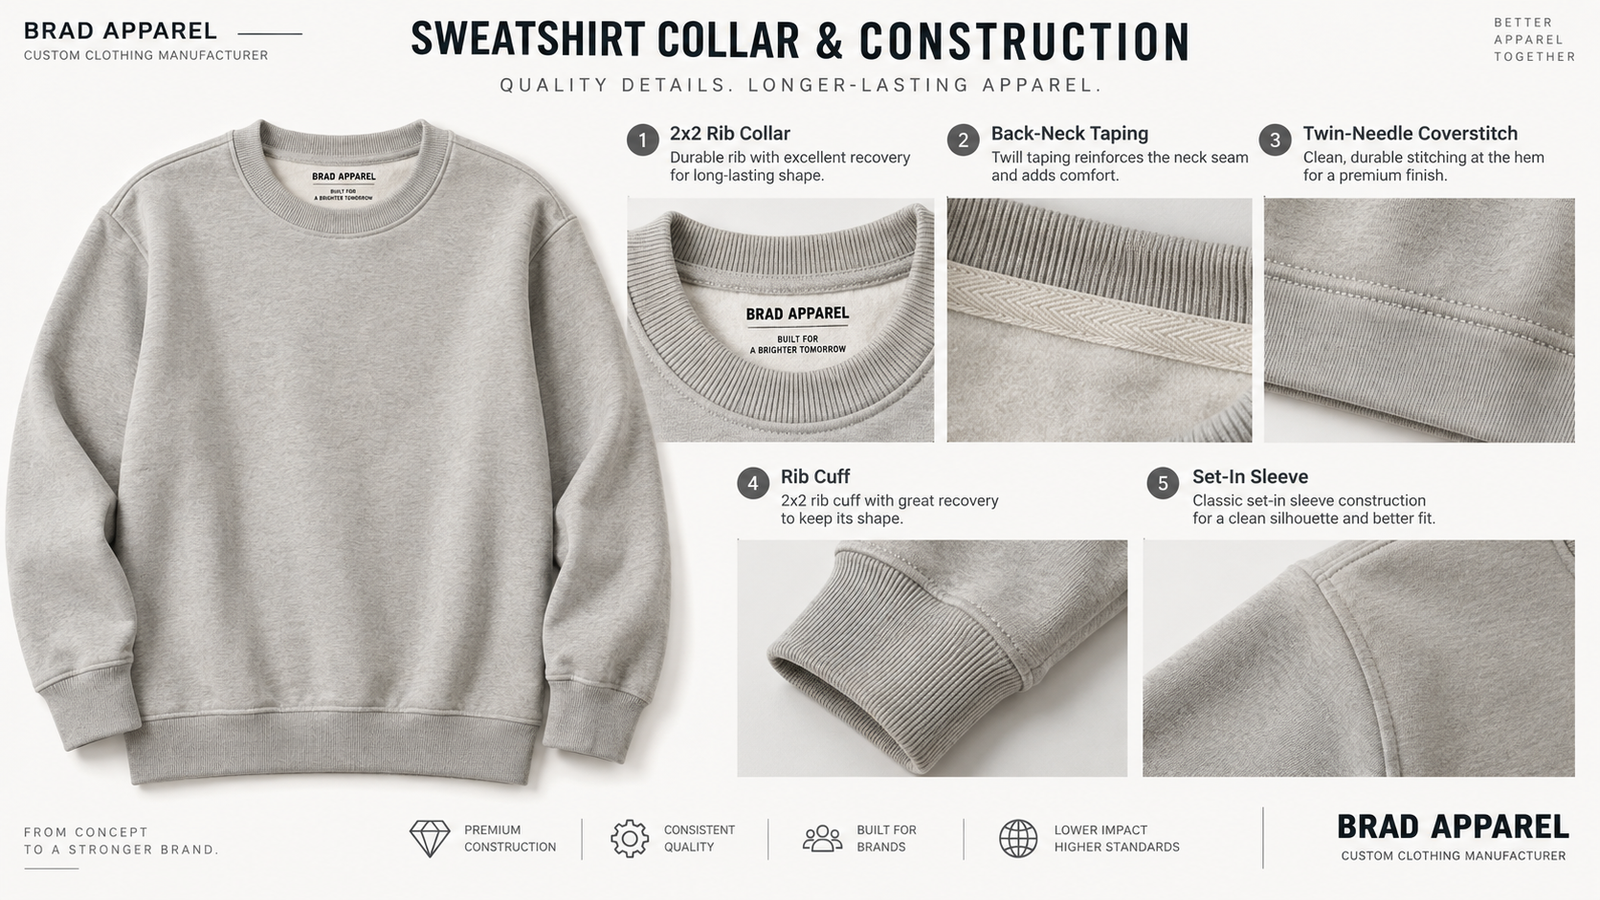
The neckline is one of the first areas where poor sweatshirt construction becomes visible.
Common problems include:
- Collar stretching
- Wavy neckline
- Rib twisting
- Uneven tension
- Neck seam irritation
These defects are usually caused by a combination of:
- Rib specification
- Collar ratio
- Sewing tension
- Main-fabric stretch
- Lack of reinforcement
Heavy 2×2 Rib
For the source production specification, a premium heavyweight sweatshirt uses:
2×2 cotton rib with approximately 5% spandex
The elastane improves recovery after stretching.
But rib composition alone is not enough.
The factory also needs to determine the correct relationship between:
Rib length ↔ Neck opening circumference
If the rib is too short, the neckline can pucker.
If it is too long, the collar may become loose after washing.
This ratio should be confirmed during sampling.
Back-Neck Taping
The back neckline can also be reinforced with tape.
Possible options include:
- Herringbone tape
- Cotton twill tape
- Self-fabric tape
Back-neck tape can:
- Stabilize the neckline
- Cover the internal seam
- Improve wearer comfort
- Create a cleaner inside finish
It is a relatively small component, but it can noticeably change the perceived construction quality.
5. Sewing Method Should Match Fabric Weight
Heavy sweatshirt fabric requires different machine settings from lightweight jersey.
Important areas include:
- Shoulder seams
- Armholes
- Collar attachment
- Cuffs
- Side seams
- Bottom hem
The source manufacturing specification uses twin-needle coverstitching around key areas such as armholes and hems. :contentReference[oaicite:2]{index=2}
For heavyweight fabric, the sewing team may need to adjust:
- Needle size
- Thread
- Presser-foot pressure
- Differential feed
- Stitch density
- Machine tension
Poor settings can create:
- Seam puckering
- Uneven feeding
- Broken stitches
- Wavy hems
This is one reason the production sample should use the actual or near-bulk fabric.
6. Decoration Changes the Production Sequence
Printing or embroidery should be confirmed before bulk sewing begins.
For many sweatshirt designs, garment panels are decorated before final assembly.
A typical workflow may look like:
Fabric Inspection
↓
Cutting
↓
Printing / Embroidery
↓
Panel Inspection
↓
Sewing
↓
Final QC
For example, a large front print may be easier to position accurately while the front body panel is still flat.
The factory should confirm:
- Artwork dimensions
- Placement
- Colour
- Technique
- Curing requirements
- Embroidery stitch density
- Backing requirements
before bulk decoration starts.
7. The First Sample Is an Engineering Test
The first sweatshirt sample should not be judged only by appearance.
It should answer several production questions.
Fit
Check:
- Chest
- Length
- Shoulder
- Sleeve
- Armhole
- Bottom opening
Construction
Check:
- Collar shape
- Rib recovery
- Seam appearance
- Cuff attachment
- Hem construction
Decoration
Check:
- Artwork size
- Position
- Colour
- Surface quality
Fabric
Check:
- Hand feel
- Weight
- Drape
- Shrinkage
Any correction should be recorded before the next sample or bulk production.
8. Wash Testing Before Bulk Approval
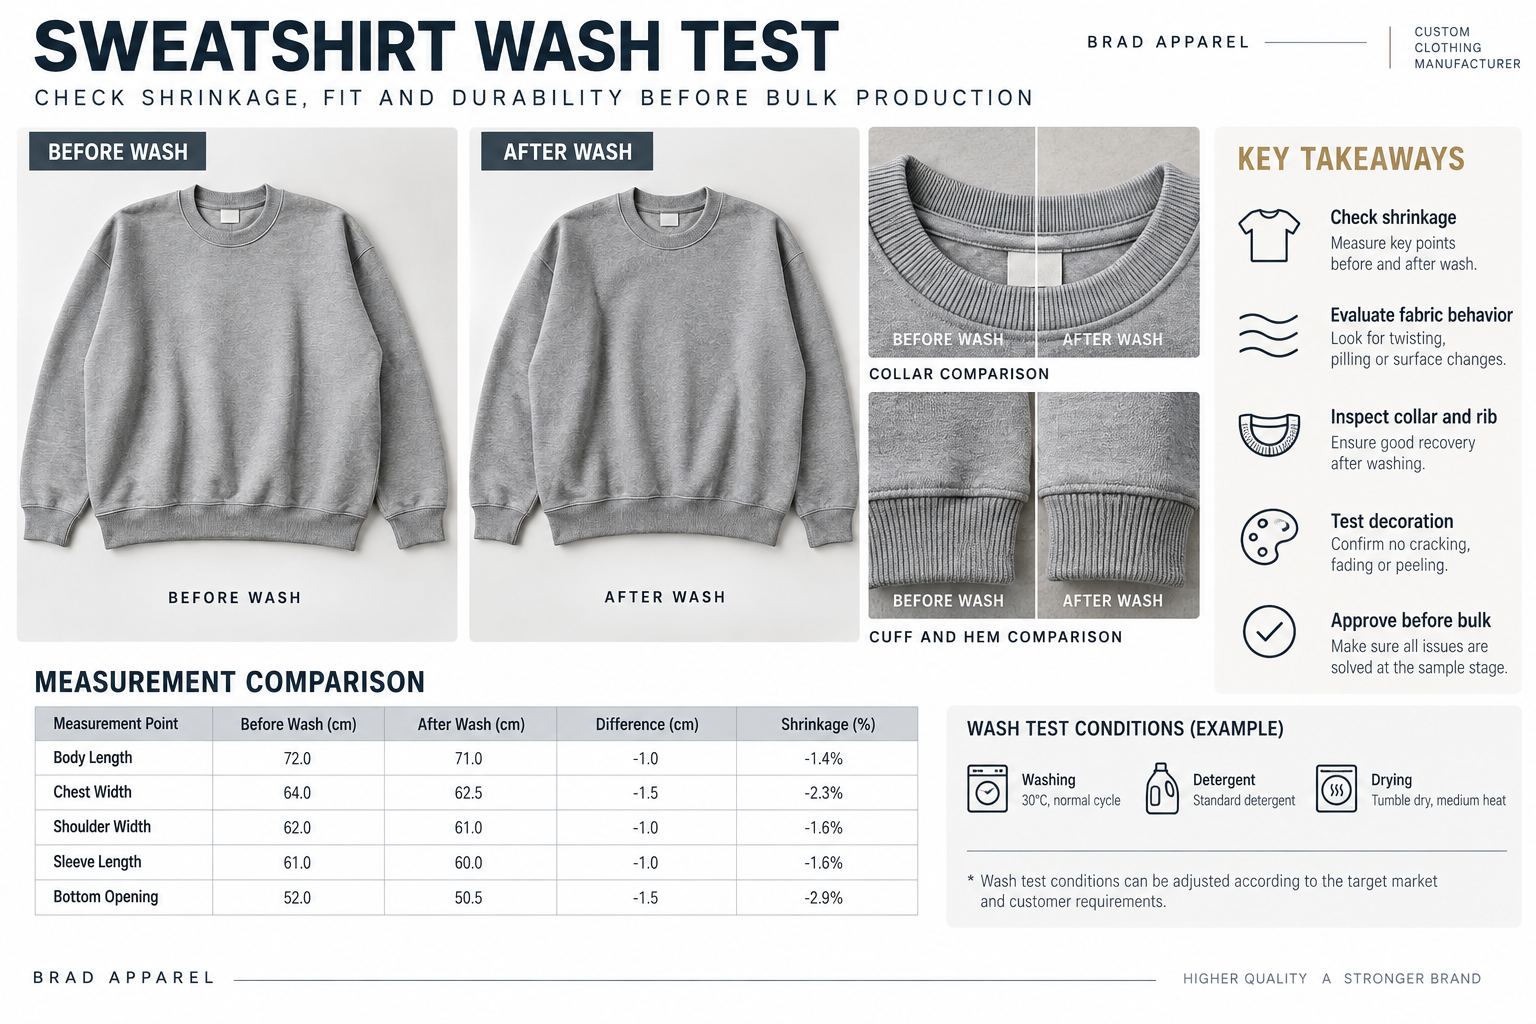
Heavy cotton sweatshirts should be evaluated after washing.
Before the wash, record important measurements such as:
- Body length
- Chest
- Sleeve length
- Shoulder width
- Bottom opening
Wash and dry the garment according to the proposed care instructions.
Then measure it again.
This helps identify:
- Length shrinkage
- Width shrinkage
- Sleeve shrinkage
- Collar deformation
- Rib recovery
- Fabric twisting
- Decoration damage
If the sample changes beyond the agreed tolerance, the issue should be corrected before bulk fabric is cut.
9. Approving a Pre-Production Sample
Once the fit, fabric and construction are confirmed, a final approved sample can become the production reference.
The approved sample should match the final:
- Fabric
- Colour
- Measurements
- Rib
- Printing
- Embroidery
- Labels
- Packaging
This is commonly referred to as a PP sample or pre-production sample.
Bulk production should be compared against this approved reference.
10. Example BOM: 420 GSM Heavyweight Sweatshirt
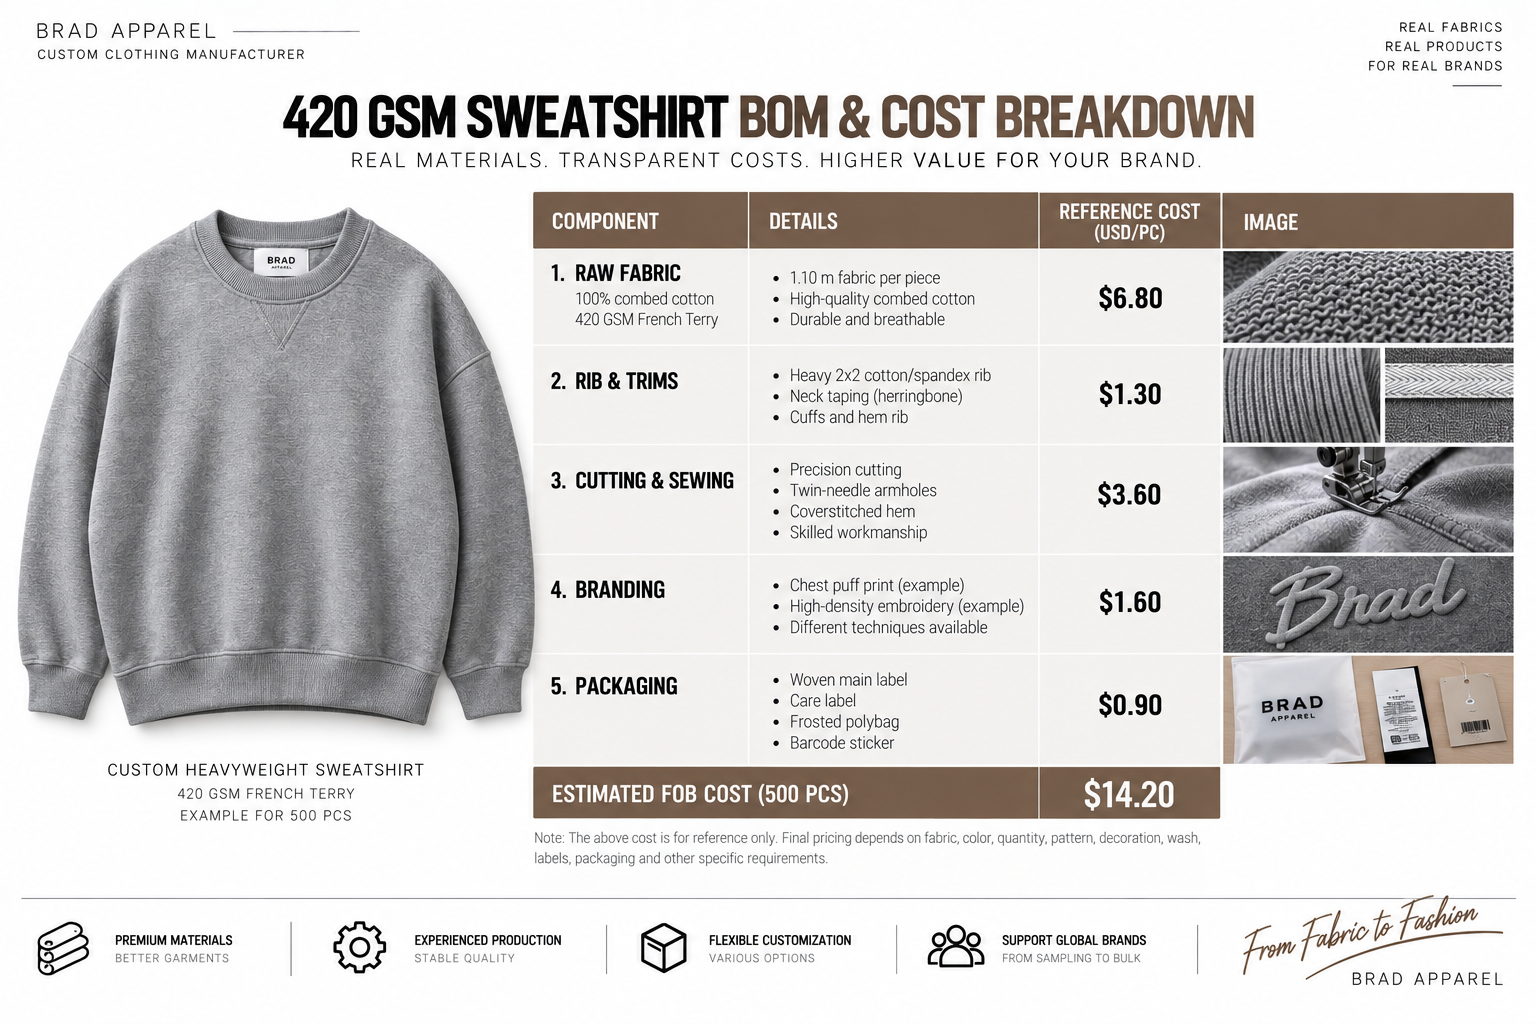
The following example illustrates how a heavyweight custom sweatshirt FOB cost can be structured for a 500-piece production run.
Raw Fabric
1.10 m of 100% combed cotton 420 GSM French terry
Reference cost:
$6.80
Rib & Trims
Includes:
- Heavy 2×2 cotton/spandex rib
- Back-neck tape
Reference cost:
$1.30
Cutting & Sewing
Includes:
- Precision cutting
- Twin-needle armhole construction
- Coverstitched hem
Reference cost:
$3.60
Branding
Example:
- Puff print
- High-density embroidery
Reference cost:
$1.60
Packaging
Includes:
- Woven main label
- Care label
- Frosted polybag
- Barcode label
Reference cost:
$0.90
Estimated FOB Unit Cost
$14.20
The figures above are an illustrative production scenario, not a universal sweatshirt quotation.
Actual price depends on:
- Fabric market price
- Quantity
- Colour
- Fabric consumption
- Size ratio
- Decoration
- Washing
- Labels
- Packaging
The original manufacturing brief uses the same $14.20 total. :contentReference[oaicite:3]{index=3}
11. Why Similar-Looking Sweatshirts Can Have Different Costs
Two sweatshirts can both be described as:
420 GSM oversized crewnecks
while having very different production costs.
For example:
Product A
- Stock cotton/poly fleece
- Existing factory pattern
- Standard rib
- Basic print
- Standard labels
Product B
- Custom combed-cotton French terry
- New oversized pattern
- Heavy 2×2 rib
- Back-neck taping
- Puff print
- Embroidery
- Custom woven labels
- Custom packaging
The visible silhouette may be similar.
The manufacturing process is not.
This is why brands should compare quotations using the complete product specification rather than only comparing:
GSM + unit price
12. Bulk Fabric Inspection Comes Before Cutting
Once the order enters bulk production, fabric should be checked before cutting begins.
Important checks include:
- Fabric weight
- Width
- Shade
- Surface defects
- Shrinkage
- Skew
- Lot consistency
If several fabric rolls are used, shade differences should be identified before garment panels are mixed.
Finding a fabric problem after hundreds of garments have already been sewn is significantly more expensive than identifying it at the roll-inspection stage.
13. Bulk Cutting
After the fabric is approved, the production marker is prepared.
Marker planning affects:
- Fabric consumption
- Cost
- Size ratio
- Waste
Pattern pieces may include:
- Front body
- Back body
- Sleeves
- Collar rib
- Cuffs
- Bottom rib
Accurate cutting is essential because measurement consistency begins before sewing.
14. Printing and Embroidery Inspection
Decorated panels should be inspected before sewing.
Check:
- Placement
- Size
- Colour
- Registration
- Surface defects
- Embroidery tension
Rejecting a defective printed panel before assembly is much more efficient than removing a completed sweatshirt from final production.
15. Sewing & Assembly
After decoration is approved, panels move into sewing.
A typical crewneck assembly may include:
- Shoulder joining
- Sleeve attachment
- Side-seam closing
- Collar attachment
- Cuff attachment
- Bottom rib / hem construction
- Neck reinforcement
- Final thread trimming
The exact sequence depends on garment construction and factory workflow.
16. Four-Stage Sweatshirt Quality Control
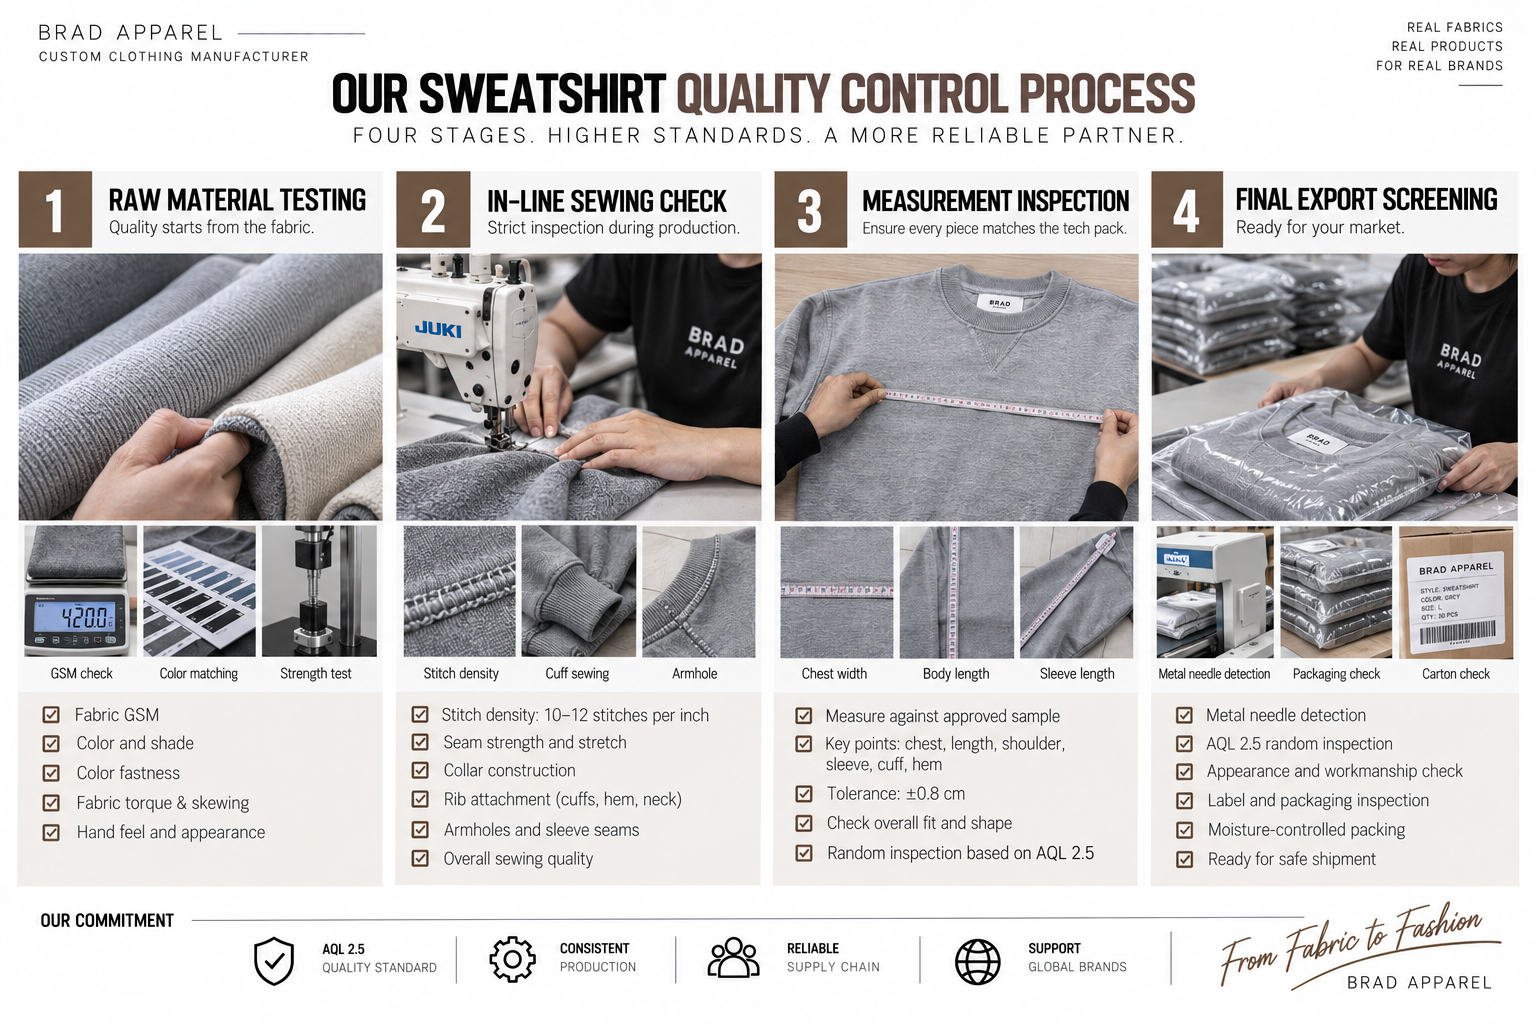
Quality control should take place throughout the order rather than only after production is complete.
Stage 1 — Incoming Material Inspection
Inspect:
- Main fabric
- Rib
- Labels
- Trims
- Packaging
Important fabric checks include:
- GSM
- Shade
- Shrinkage
- Surface defects
Stage 2 — In-Process Inspection
During sewing, check:
- Collar attachment
- Rib tension
- Stitch density
- Armhole seams
- Cuff alignment
- Decoration position
The source manufacturing brief uses approximately 10–12 stitches per inch as one reference for sewing control. :contentReference[oaicite:4]{index=4}
Stage 3 — Final Measurement
Finished garments should be compared with the approved size chart.
Important measurement points include:
- Chest
- Body length
- Shoulder
- Sleeve length
- Cuff
- Bottom opening
The source QC example uses ±0.8 cm as its measurement reference. :contentReference[oaicite:5]{index=5}
Final production tolerance should always be agreed before bulk production begins.
Stage 4 — Outgoing Inspection
Before shipment, check:
- Garment appearance
- Measurements
- Printing
- Embroidery
- Labels
- Packaging
- Carton quantity
Depending on the buyer's requirements, this stage may also include:
- Needle detection
- Random AQL inspection
- Moisture control
17. Packing the Finished Sweatshirts
After QC, the garments move into finishing and packing.
A typical process may include:
Thread trimming
↓
Pressing
↓
Folding
↓
Size / Barcode Check
↓
Individual Packaging
↓
Carton Packing
The packing specification should be confirmed before production.
For example:
- Standard clear polybag
- Frosted zipper bag
- Custom logo bag
- Barcode label
- Size sticker
18. What to Send a Sweatshirt Factory for an Accurate Quote
The more complete the information, the more useful the quotation.
Before contacting a manufacturer, prepare as much of the following as possible:
Product
- Sweatshirt type
- Target quantity
- Size range
Fabric
- Composition
- GSM
- Colour
- Desired hand feel
Fit
- Oversized
- Regular
- Boxy
- Cropped
- Raglan / set-in
Artwork
- Vector file
- Dimensions
- Placement
- Decoration technique
Branding
- Main label
- Care label
- Size label
- Hang tag
Packaging
- Bag type
- Barcode
- SKU requirements
If you do not yet know the exact fabric specification, Brad Apparel's Fabric & Sourcing process can be used to compare suitable materials before sampling.
19. How Brad Apparel Handles Custom Sweatshirt Development
A typical project can move through:
Inquiry / Tech Pack
↓
Fabric Sourcing
↓
Quotation
↓
Pattern Development
↓
Sample
↓
Revision
↓
PP Approval
↓
Bulk Production
↓
Quality Control
↓
Packing & Shipping
Our Pattern Development service supports custom silhouettes rather than requiring brands to rely only on standard factory blocks.
For decoration, brands can also review our Printing Techniques and Embroidery Techniques options.
FAQ
What Does a Factory Need to Manufacture a Custom Sweatshirt?
The most useful information includes:
- Design or tech pack
- Measurements
- Fabric specification
- GSM
- Colour
- Quantity
- Decoration
- Labels
- Packaging
Do I Need a Tech Pack?
A complete tech pack is helpful but not always mandatory.
A manufacturer can sometimes begin from:
- Reference garment
- Clear design drawings
- Measurement chart
- Detailed reference photos
The missing production information still needs to be confirmed before bulk manufacturing.
Should the Fabric Be Confirmed Before the Pattern?
Ideally, yes.
Fabric weight, stretch, shrinkage and drape can affect how the finished pattern behaves.
How Many Samples Are Needed?
There is no fixed number.
Sampling continues until the important specifications are approved.
A simple style may require fewer revisions than a garment with:
- Complex pattern construction
- Custom washing
- Multiple decoration processes
Why Should a Sweatshirt Sample Be Wash-Tested?
Wash testing can reveal:
- Shrinkage
- Twisting
- Collar deformation
- Rib recovery issues
- Print or embroidery problems
before bulk production begins.
What Is a PP Sample?
A pre-production sample is the approved garment used as the reference for bulk production.
It should represent the final:
- Fabric
- Fit
- Construction
- Decoration
- Labels
What GSM Should I Specify?
GSM should be chosen according to the intended product rather than assuming heavier is always better.
If you need a general explanation of sweatshirt weights and fabrics, see our What’s the Point of a Sweatshirt? guide.
Final Thoughts
Manufacturing a sweatshirt is a sequence of connected decisions.
A production problem rarely exists in isolation.
Fabric affects the pattern.
Pattern affects consumption.
Rib affects the neckline.
Decoration affects the production sequence.
Wash performance affects final measurements.
That is why the most important work happens before bulk production begins.
The goal of sampling is not simply to create one good-looking sweatshirt.
The goal is to create a repeatable production standard that can be reproduced consistently across the entire bulk order.
Keep Reading